Hoppa till innehåll

Framsidan

Höstkrukor i grönt och vitt

Det är dags att byta ut sommarblommorna till höstväxter. I år blir det fina höstkrukor i grönt och vitt. Här är några tips på hur du får fina höstkrukor som står sig i flera månader.

Natalia Lindberg Trädgårdsdesign höstkrukor vita prydnadskål sockertopsgran ljung murgröna
Sockertoppsgran, prydnadskål, ljung och murgröna

Ny jord i krukan

Sommarblommorna som har gett med sig får flytta till komposten. Eftersom sommarblommor tar upp en hel del näring från jorden brukar jag passa på att byta ut den. På så vis kan jag vara säker på att mina höstväxter får den näring de behöver.
Natalia Lindberg Trädgårdsdesign - gamla sommarblommor petunior
Trötta petunior som har gjort sitt

Hur många växter får plats?

Natalia Lindberg Trädgårdsdesign höstkrukor vita prydnadskål sockertopsgran ljung växterna
Alla växterna

Svaret är fler än man tror. Speciellt på hösten när växterna inte längre växer speciellt mycket brukar jag fylla upp krukorna ordentligt. Jag vill gärna inte att jorden skall synas och att krukan ser fin ut från dag ett så jag packar den full.

I en 40 cm bred urna får det plats 7-9 växter. I detta fall blev det:
1 Sockerstoppsgran
2 Prydnadskål
2 Ljung
1 Murgröna
1 Bacopa (kvar från sommarkrukan)

Ett recept för fina höstkrukor

Kanske har du satt ihop växter i en kruka men inte blivit helt nöjd? Färgerna är fina, blommorna friska men det ser inte rätt ut och du kan inte förklara varför? Svaret brukar ligga i formen på växterna. En lyckad kombination behöver tre ”våningar” av växter – det som på engelska bruka kallas för ”thrillers, fillers and spillers”. Du bör ha:

  1. En växt som växer upprätt (en uppstickande thriller)
  2. En eller flera växter som breder ut sig, fyller ut och väver ihop (filler)
  3. En eller ett par växter som hänger (spiller) över kanten.

I detta fall är Sockertopsgranen i mitten min ”thriller”, prydnadskålen och ljungen min” filler” och mugrönan samt bacopan mina ”spiller”.

Natalia Lindberg Trädgårdsdesign höstkrukor vita prydnadskål sockertopsgran ljung murgröna
Sockerstoppsgran, Prydnadskål, Ljung, Murgröna, Bacopa (kvar från sommarkrukan)
Natalia Lindberg Trädgårdsdesign höstkrukor vita prydnadskål sockertopsgran ljung 17
Prydnadskål med ljung bakom
Natalia Lindberg Trädgårdsdesign höstkrukor vita prydnadskål sockertopsgran ljung murgröna
Prydnadskål
Natalia Lindberg Trädgårdsdesign höstkrukor vita prydnadskål sockertopsgran ljung murgröna
Sockertoppsgran, prydnadskål, ljung och murgröna. Plasturnor från Bauhaus.

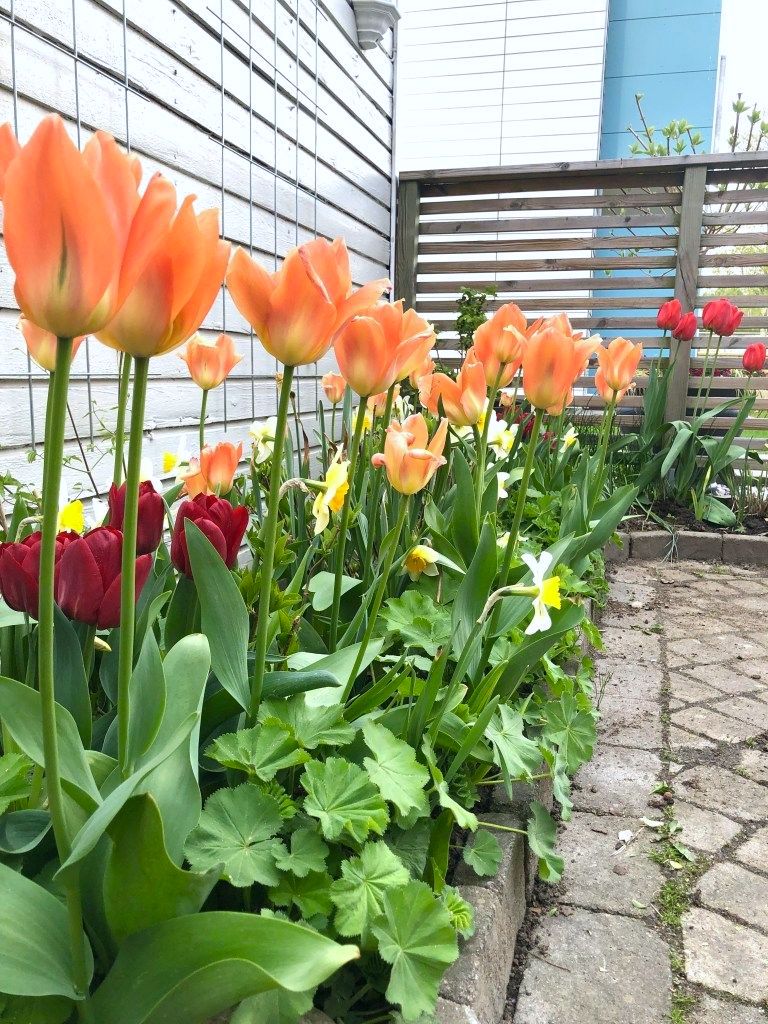
Vårlökar – Tulpan ’Orange Breeze’ och pingstlilja ’Sempre Avanti’

Tulpan Orange Breeze pingstlilja Sempre Avanti - Natalia Lindberg Trädgårdsdesign
Pingstlilja ’Sempre Avanti’, tulpan ’Orange Breeze’ och jättedaggkåpa

I min entré växter den här kombinationen med pingstlilja ’Sempre Avanti’, tulpan ’Orange Breeze’ och jättedaggkåpa. Det har smygit sig in en och annan röd tulpan också som jag inte är alltför förtjust i, så den kommer åka ut =)

Letar ni efter inspiration på fler fina kombination av vårlökar? Kika in till trädgårdskanalen Garden Answer på Youtube. Där finns minst många underbara förslag.

Garden answer 2019 spring bulb tour

DIY Fall Heather Wreath

I got my hands on some Heather (Calluna vulgaris) and decided to make a wreath.

You can make a this wreath with pretty much any plant that does well when dried. Lavender would be my favorite.

Step 1 – Get your materials

You will need:

  • a wreath form (I used a 20 inch metal form but any type and size is fine)
  • floral wire
  • wire cutters (I used scissors. It would but I would’t recommend it ;-p)

Step 2 – Make bundles

Separate the Heather into bundles and wrap them using the floral wire. You will need around 20-30 bundles, depending on the size of you wreath form.

Adjust the size of the bundles based on the size of your wreath form. Bigger forms require wider bundles – smaller forms do better with narrow bundles.

Step 3 – Tie the first bundle

Tie the first bundle to the wreath form. Make sure it’s tight!

Step 4 – Tie the remaining bundles

Continue to tie the bundles to the form on top of each other. Do every second one facing slightly inwards vs slightly outwards.

Step 5 – Check your wreath

Have a look at your wreath and make sure it looks symmetrical. Prune branches that might be sticking out or add an extra bundle to any area that might need it.

Disclaimer: At this point I realised that I wanted the bundles to start at the bottom and go upwards on both sized (not around in a circle). I redid all the bundles on the right side and had them facing upwards instead. It took some extra time and was was a bit of a pain but still worth it. It would have bugged me if I hadn’t fixed it .

Step 6 – Add decorations

It’s time for the decorations! It’s completely up to you how and how much extra stuff you want to add. You could just go with a nice piece of lace and be done with it.

I chose rowan-berries and hydrangea blooms since I had them in my garden.

Rowan-berries
Hydrangea ’Little Lime’

Tuck the decoration into the wreath. Use wire if needed. I just poked the hydrangea and berry stems in between the Heather and messed around with them until I liked the way they looked.

Hydrangea ”Little lime”
Purple and orange contrast each other

All done!

Hang your wreath in a spot where you can see it every day and enjoy!

Tiny and pretty Heather blooms

Late Summer Container Arrangements

Late summer is my favorite time of year for container arrangements. All that beautiful color both in blooms and foliage!

Purple Chrysanthemum, Sweet potato vine, Dusty Miller (Jacobaea maritima) and Hebe ’Zea’

This year, I’ve planted up quite a few containers to bring the late summer feeling to the entrance of the house.

Purple Chrysanthemum, Sweet potato vine, Dusty Miller (Jacobaea maritima) and Hebe ’Zea’

A simple design trick to make an arrangement look great is to pick just a few colors and to repeat them. In this case the Hebe’s yellow and green foliage is repeated in the potato vine. And the pink edges come again in the blooms of the Mum.

Both the Rudbeckia fulgida ‘Goldsturm’ is a perennial and will come back next year. However, it’s always risky to winter over plants in containers so I might plant them in the ground in a month or two, just to be sure they make it though the winter.

Coleus ’Chocolate Mint’ in the foreground
Coleus, Begonia and Dichondra ’Silver Falls’

Dichondra ’Silver Falls’ is one of my favorite plants for late summer and fall containers. It brings contrast to the arrangement that makes the other plants pop.

Rudbeckia Fulgida ‘Goldsturm’, Coleus ’Chocolate Mint’, Carex ’Evergold’, Chrysanthemum, Dichondra ’Silver Falls’ and Ivy
How it all came together

Dwarf Patio Raspberry ’Ruby Beauty’

First berries are about to ripe.

’Ruby Beauty’ is dwarf raspberry shrub that grows just 90cm (3ft) tall, has no thorns and usually needs no support. In spite of its dwarf height, it produces about 1.5kg (3lb 6oz) of raspberries, all with traditional raspberry size and flavor.

’Ruby Beauty’ Dwarf Raspberry loaded with berries

I grow it in a 40 cm (16in) container in vegetable soil and fertilize once a week. It get sun from morning until 5 PM and is doing amazing!

The small size makes it easy to tuck into my vegetable garden.

Vegetable garden in a small space

Window boxes on the south facing wall are great for strawberries.
I’m thinking about getting three more for basil and other herbs.

For a long time I had given up on the idea of growing veggies. Our back garden doesn’t get enough sun and our two bunnies would get to the plants before I did.

One day I was scrolling though photos of Ulla Molin’s garden when I stumbled upon a picture of here veggie garden. It was small and its structure reminded me of my front entrance.

A couple of cheap raised beds, containers and window boxes later I had a vegetable garden.

Coriander gone to town. These were just 3 small plants a few weeks ago.
Rhubarb was here when we moved in
Raspberry ’RUBY BEAUTY’ (stays small and produces lots of berries).
Chive starting to bloom in the back.
Entrance turned vegetable garden.